Number of posts : 84 Registration date : 2008-12-26
Subject: Re: Photos of progress Wed Aug 26, 2009 3:44 am
Thanks, Bluefoor (-:
I live at the countryside, pretty much isolated from any big population center, and the weather is still quite warm during the day, with no major temperature drops during the night. I think it's better if it's a bit colder rather than warmer, because too much heat could spoil the process. If you feel your daytime temperature is not sufficient to kindle the internal motion of the matter, I believe it can't hurt to provide assistance via some VERY gentle external heat applied to the parts of the vessel that are not exposed to the Fire.
My work indeed left only a red crystal matrix which appears dry, but feels slightly unctuous - and this is completely OK.
One very important thing I wish to point out is that not all Our Waters are born Philosophical. You may well not obtain the red crystal matrix if your Water didn't test positive for "Philosophical" within the first few hours after its birth, and I'm speaking from experience. Instead, you may only obtain a resinous Chaos. And this "test" (completely natural) is something I prefer not to reveal here, but you can somehow deduce it from the text describing the distillation Path to the crystals. This same "test" probably applies to the distillation path as well, so please make sure you understand before you work in vain.
If you chose to follow the distillation path, please make sure to be patient and take your time to perform your last distillation in gentle heat, or else your work may fail, because you'll evaporate the Sulfur of the Matter, which is supposed to incarnate into the Matter's Virgin Earth - which incarnation is what forms the red crystal matrix we are looking for.
Best of luck!
bluefloor Admin
Number of posts : 333 Age : 48 Location : Kalispell, Montana Registration date : 2009-02-10
Subject: Re: Photos of progress Wed Aug 26, 2009 4:55 pm
AB, I left one vessel uncovered and it took on a Fiery smell after 3-4 days but I could not discern anything within the first few hours. If you will help me with this matter I would appreciate it. jhstrong1976(at)yahoo.com
AB
Number of posts : 84 Registration date : 2008-12-26
Subject: Re: Photos of progress Wed Aug 26, 2009 5:38 pm
Hi Bluefloor,
To test if the Water is Philosophical or not, no more than a few hours are necessary. If it tests negative, I personally see no point to continue the experiment, but rather throw it away and start again with newborn Water. I cannot say any more about the test, only that you may find a clue to it in the recipe of distillation towards forming the red crystals, and in some of Nick's earlier Water Works. Search them out...
Please understand that I believe in sharing and pointing out, but not in spoonfeeding. I have passionately read, compared and cross-referenced hundreds of pages of Alchemical texts (not to mention year-long digestions, hands-on lab work with many trials and errors and the mega-insights I've gathered from Nick's shared progress on his own Path) - so I see no reason why you shouldn't gather at least SOME of the insights on your own. Why should I be so cruel to deny you the satisfacton of gradually cracking the final codes by yourself?
I also plainly and publicly admit that I haven't yet made it past the beautiful red crystal matrix, so the Stone is not yet within my arm's reach, although my heart is already there.
Use your own discernment and intuition - no written text or external clue will ever be able to replace them.
Sincerely wishing you best of luck...
spagyricus
Number of posts : 34 Location : Kingston Springs, TN Registration date : 2009-02-18
Subject: Re: Photos of progress Wed Aug 26, 2009 5:49 pm
AB,
I have some dew that I collected and put in a sealed container in my cool basement. I put this water in am open mouth glass jar and covered it with a cloth fixed with a rubber band. I placed this outside out of the direct sun. I have noticed very small sparkely material when I swirl the dew water. Maybe its my imagination, but it seems to have a slight pinkish hue. I hope this material will evaporate into the smarmy red crystals.
kevinpaw123
Number of posts : 217 Age : 60 Location : Garrsion, Minnesota Registration date : 2009-01-25
Subject: Re: Photos of progress Wed Aug 26, 2009 7:20 pm
Hey guys here are some pictures of the 2nd dew batch. Remember it leaked so I decided to distill it just to see what would happen. These photos are after 5 distillations. When I started the dew/salt was very clear with hardly any visibly noticeable salt. But look now! " border="0" alt=""/>" border="0" alt=""/>" border="0" alt=""/>" border="0" alt=""/> A drop of liquid fell on my forearm that came from the heating mantel side of the distiller. The curious side of me said taste it! I did and it gave a strange feeling of burning without pain followed by a numbing sensation. There is also a chemical smell almost like sulfur that now comes from the heating side when I disconnect the flasks to recombine the dew with the salt. I tried a drop from the distilled dew on the reciever end and it had no such effect! I'm going to continue distilling for a total of 10 times. I don't know if this is a good idea but something says go for it!
AB
Number of posts : 84 Registration date : 2008-12-26
Subject: Re: Photos of progress Wed Aug 26, 2009 8:35 pm
spagyricus wrote:
AB,
I have some dew that I collected and put in a sealed container in my cool basement. I put this water in am open mouth glass jar and covered it with a cloth fixed with a rubber band. I placed this outside out of the direct sun. I have noticed very small sparkely material when I swirl the dew water. Maybe its my imagination, but it seems to have a slight pinkish hue. I hope this material will evaporate into the smarmy red crystals.
Hi Spagyricus (-:
How did you colect your Dew? I have a certain opinion about the Dews and Dont's of Dew collection... I believe it should not be collected with glass plates or any type of sophisticated instruments (like those made for collecting Dew to be used as drinking water), but by sheets (linen/cotton) hanging above the ground (not touching it) so the sheets can also absorb the vapors rising from below (from the surface of the earth) during the night.
My intuition tells me that this is a better way to have a more complete Matter, more efficiently facilitating the incarnation of the Sulfur into the Salt body during evaporation/crystalization.
I also think that a number of additional imbibations with new Water is necessary to finalize the incarnation. Check out 'Chemical Moonshine'...
kevinpaw123
Number of posts : 217 Age : 60 Location : Garrsion, Minnesota Registration date : 2009-01-25
Subject: Re: Photos of progress Sun Nov 29, 2009 11:19 pm
Hi guys! The 1st batch of dew is done. As Nick thought the seal leaked. I saw 3 or 4 drops of dew made its way through the seal. I filtered and separated. When I 1st added the silver and gold the dew was clear. After a couple of days salt crystals began to form in both. I added more silver and gold. More crystals seem to be forming but the metals don't seem to be dissolving. The crystals in both are fairly large and clear/clean looking. Am I on the right path still or have I done something wrong? Here are some photos. " border="0" alt=""/>" border="0" alt=""/>" border="0" alt=""/>" border="0" alt=""/>" border="0" alt=""/>" border="0" alt=""/>
Guest Guest
Subject: Re: Photos of progress Mon Nov 30, 2009 1:37 pm
Kevin,
I say there's two possibilities. One is that a small amount of gold is indeed dissolving and causing the salt to precipitate out. More likely though is that the water is evaporating and that is what is causing the salt to precipitate out. The reason it's not dissolving the gold could be because you did something wrong, possibly because the seal was not tight or possibly because of another reason (not using the right temperature baths or the right periods). I think that the salt and the water are supposed to become one and the solution no longer tastes salty but kind of sweet when you are done. But I have not actually finished this path so maybe somebody else will know better.
Zosimo
Number of posts : 383 Registration date : 2009-01-19
Subject: Re: Photos of progress Mon Nov 30, 2009 3:10 pm
Hi AB, May be we can catch our Solar Sulfur coming from the ground with cold surfaces like plastic bags, bottles or glass flasks. I suppose that in the past was easyer to employ sheets than iced iced water bottles or bags full of ice cubes. Or you have other insights?
Zosimo
AB
Number of posts : 84 Registration date : 2008-12-26
Subject: Re: Photos of progress Mon Nov 30, 2009 5:11 pm
Zosimo wrote:
Hi AB, May be we can catch our Solar Sulfur coming from the ground with cold surfaces like plastic bags, bottles or glass flasks. I suppose that in the past was easyer to employ sheets than iced iced water bottles or bags full of ice cubes. Or you have other insights?
Zosimo
Hello Friend,
I am a firm believer in linen or cotton sheets (with no coloring or any extra processing). Glass surfaces will lean towards collecting from Above, while sheets are two-way absorbents.
I believe that the vapors from Below are also important, and that's why I prefer sheets. My richest batches were obtained with sheets, and were reducable to a liquor-like consistency, while the batches from glass surfaces showed no such quality.
Strictly my opinion...
kevinpaw123
Number of posts : 217 Age : 60 Location : Garrsion, Minnesota Registration date : 2009-01-25
Subject: Re: Photos of progress Sun Dec 06, 2009 4:29 am
The gold didn't seem to be dissolving so I distilled it. I hope this works out. The first 2 photos are after the 2nd dist recombining... The rest are after the 3rd dist. Is the colored liquid on the neck the gold oil forming? Your thoughts guys? I plan on distilling 4 more times for a total of 7. " border="0" alt=""/>" border="0" alt=""/>" border="0" alt=""/>" border="0" alt=""/>" border="0" alt=""/>" border="0" alt=""/>" border="0" alt=""/> All the gold you saw from my last post is in this dew/salt solution. Approx 1 g
kevinpaw123
Number of posts : 217 Age : 60 Location : Garrsion, Minnesota Registration date : 2009-01-25
Subject: Re: Photos of progress Sat Dec 12, 2009 10:01 pm
Hi all! This is after I added another .9 g of gold. I have distilled a total of 8 times. I have crushed the salt/gold to a fine powder. I no longer see any gold in the metal form. Nick do I keep adding gold until the salt no longer dissolves gold? There is 1.9 g of gold that has dissolved so far! The salt has changed colors from clear to white to pale pink. Here are some more photos. " border="0" alt=""/>" border="0" alt=""/>" border="0" alt=""/> My Dad is going to weld one of the iron end caps for me then all I have to do is find or make a good seal for the other side! Love the work!
phillip_reed
Number of posts : 101 Age : 44 Location : Queenland,Australia Registration date : 2008-12-28
Subject: Re: Photos of progress Sun Dec 13, 2009 7:32 am
hello again, i took a photo of the peacock tails on the top of the dew water of last months collection that i had also added silky oak wood to. it was only just starting to show itself on the top when i took the photo. it took up the whole top over the remaining water and started off as an oil that became a skin before drying to a powder. the wood stained the color of the water and there's a big difference to last months and this months collection coloured water because this month i didn't add the wood to the water i just heated it up and put it into the container. https://2img.net/h/i812.photobucket.com/albums/zz48/Avatar1979/dew%20alchemy/peacocktails.jpg
its very cool to sit and watch this material change into so many things before becoming a powder, with a little bit of heat they form almost out of nothing, little cotton clouds in the water then as the heat raises they change colour and are dark masses and form mirror films and flicker like glitter. but once the heat is at 100'C or around abouts, the films seem to be lost in the bubbles, but they soon turn back to clouds when its taken off the heat as it nears the last bit of the distilling! i'm not 100% certain if that was the order of the way it went with the changes but it did change to all of those things during the distill, i think now it started with the films first, then the dark matter, then cotton white clouds( if you lowered the temp back before the end), and then peacock tails, then skin, then powder.
i have it down to a maths now, i can know how much i can distill with different portions of time. going off the few times i have done it, it's come down to a maths so i can know when to be home to change it over or when to change over the receiver container, and it's within 5-10mins grace. i did that because i can't just stay home to wait for it or turn it off and then wait to come back home and start it over, it distills 1ml per 42sec not on the run it's quicker when its going but i had to add the start heatup time to it (on an over-all scale of things if you include the starting up heating time before the water starts to distill) right from the time you start the new collection bottle to the end and approximated from there, not from when the water starts its first drop over. And 12Liters in 135hours, and it has been pretty good at keeping to the maths i worked out around it so far, i only have a 1 liter boiling bottle and so its about a 9 hours change-over, because i fill it to 800 mls. i wanted to get it down to a finer art so i can manage to do the distilling of all the collected dew in the shortest amount of time. in saying all this, since wednesday afternoon i decided to go ahead and start this months collection thru the distilling of it, and following the instructions from the new book, normal dew path 3, i have 6liters done as of one hour from this post time, i have found that i have something around 4-5 liters left, i used some of the collection to do the salt\dew water path but i have almost disbanded that idea unless there is a quicker way to do the salt\dew process, as it is it will take a constant 6 days to distill the dew once, not stopping, and to do that 10 times is 2 months. and i just saw something in that as i wrote it, the amount i have chosen to distill is 12 liters, number 12, it will take 6 days to distill at the boiling temp of water at its limits, and there is one day of rest in b.m. 6 days the world was created and one days rest in B.M. i guess if i looked harder the different temp of the water would show me the creation as well like i started to point out by the changes to the objects in the water, mirrors, clouds, dark masses, light and dark. its all in there if i was looking for it.
i took a picture of the separated salt bottom water (which is 100mls) when i was about 2/3 thirds of the way thru distilling the dew collection amount. because it has been close to the hot plate and where the dew salt had slide down the bottle it had dried and there seems to be a fair bit since i'm only half way. the picture only shows the wall of the bottle where the salt had dried. https://2img.net/h/i812.photobucket.com/albums/zz48/Avatar1979/dew%20alchemy/S8004310.jpg
I will do the dew distilling 10x and do as the book says and make a post on the actual amount of real dew i have distilled and the amount of dew salt i got out of it when this is completed. so i've been keeping a bit of records for my own interest, how much for how much.
this is my next step getting ready for 2 months from now, if all goes well! i know its galvinated at the moment i haven't fired it yet i was going to wait for the rest of the project to be ready before i go ahead and do that, and it's a fair size crucible and i've seen that it has a rounded smaller dollip in the bottom of both sides of the pipe ends so i can tip it on its edge and hopefully mold the shape of the stone as it's drying inside. https://2img.net/h/i812.photobucket.com/albums/zz48/Avatar1979/dew%20alchemy/S8004306.jpg
photos were uploaded as full camera pictures and so that i didn't take up so much space on this page with them as well as the update information as it was, i just added a link to them instead. because of christmas and new years coming up i know that i won't get to do the whole distilling of the dew for some time and yet another reason for making an approx maths around the distilling of it. but i go on call at work as of wednesday this week we are in now so i'm planning to finish the first distilling of it before then. so it can be filtered and heated in b.m. or sitting before i restart the distilling of it the second time around.
kevinpaw123
Number of posts : 217 Age : 60 Location : Garrsion, Minnesota Registration date : 2009-01-25
Subject: Re: Photos of progress Sun Dec 20, 2009 11:24 am
I'm working on the silver/salt dew. I've distilled, crushed and recombined 4 times so far. I will bring through 10 cycles.
The saffron bottle has the gold/salt in it. I distilled and recombined 11 times. Does it look right at this point Nick? To the naked eye the gold salt looks lite pink
I am waiting for the furnace I ordered.
Guest Guest
Subject: Re: Photos of progress Mon Dec 21, 2009 2:52 pm
Hi Kevin,
do you realize that your heating mantle is for a much bigger flask. The flask should fit in tightly into the mantle otherwise you waste a lot of energy. Happily we only need to heat up water.
Frank
Last edited by Frank on Mon Dec 21, 2009 6:47 pm; edited 1 time in total
NDC Admin
Number of posts : 599 Age : 43 Location : beyond the veil Registration date : 2008-12-26
Subject: Re: Photos of progress Mon Dec 21, 2009 4:35 pm
Hey Kevin, It looks to me like your dew water did not become the Alkahest, but I have a feeling that you are on the right track anyway. As I was scrolling down the page looking at the photos, and I saw that you had redistilled the gold leaf and dew salt water until you could no longer see the gold, I was thinking to myself "awe that's great, now all he needs to to do is heat it up in an iron pipe crucible" and sure enough that's exactly what you did.
Once you heat it up so you reached 2200F for an hour, then let it cool and you will probably have a pink salt. Gold melts right under 2000F, so that's why you should heat it up to at least 2200F to make sure the gold inside is actually molten. Because the heat of the furnace might be 2000F, but that doesn't mean the heat inside the iron pipe is that hot.
After you do the heating, crush up the pink powder and then add some more fresh powder that you didn't heat up, and mix those two together, and heat it up again. Keep repeating this, and hopefully something incredible will start to happen. If you just keep getting the same color pink salt, then the sodium chloride might be getting in the way. Unfortunately there is no way to remove it easily.
The ideal situation probably would have been to distill the dew salt water, and save the distillate, but get rid of the salt. Then add some ammonium nitrate to the dew distillate and evaporate it on very gentle heat until its super saturated, then place in fridge to sprout crystals. These crystals would probably contain a potent spirit of dew that was being increased during the long digestion period of you dew/salt water solution.
With this ammonium nitrate, you could mix 3 parts of it with 1 part gold leaf by weight, and use some more of the distilled dew spirit, and keep redistilling like you did with the salt water, until the gold is no longer visible and its unified with the ammonium nitrate salt, probably making it slightly pinkish or peach. Then grind the crystals to a powder and heat it in the crucible at 2200F for one hour. Of course, this seems a little dangerous since its ammonium nitrate and I don't know if it would blow up. Thats why ammonium chloride would probably make more sense, and be much safer.
Then after you take the material out of the crucible, you can sublime the ammonium chloride to separate it, and be left with a pink or purple calx of gold, which you would need to mix with fresh ammonium chloride that was treated with the dew spirit in the ratio of 1 part gold to 3 parts sal ammoniac. Then heat it again for an hour, and hopefully when you remove the salt ammoniac via sublimation, this time you will have a glass-like material that is the Stone of the 1st Order.
I think I might try that myself with some silver to see what happens. But silver is tricky because the stone is white and it's hard to know if its a real stone or just a silver compound. But silver tends to be blue when dissolved and made into a salt, so it might be easy to tell the two appart. The test of transmutation will of course prove if the method was a success.
And I wonder what antimony might produce? The problem with antimony is that when you sublimate it with ammonium chloride, it goes up with the sal ammoniac and colors it red, and this is called the "flowers of antimony". Dissolving it in water might be a way to separate the antimony from the ammonium chloride, but then again, the Stone is water soluble, so you still have a problem there.
But I'm convinced your mistake was a happy one Kevin, and a new method of making the Stone will be uncovered by your experiments.
kevinpaw123
Number of posts : 217 Age : 60 Location : Garrsion, Minnesota Registration date : 2009-01-25
Subject: Re: Photos of progress Mon Dec 21, 2009 11:20 pm
Hey Nick! Your depth of knowledge never ceases to amaze me! I feel encouraged by your comments and hints. Thanks again for your optimistic words! Love the work!
kevinpaw123
Number of posts : 217 Age : 60 Location : Garrsion, Minnesota Registration date : 2009-01-25
Subject: Re: Photos of progress Tue Dec 22, 2009 10:34 pm
Thanks again Nick. I ordered some ammonium chloride for future use.
kevinpaw123
Number of posts : 217 Age : 60 Location : Garrsion, Minnesota Registration date : 2009-01-25
Subject: Re: Photos of progress Wed Jan 06, 2010 12:45 am
I received the furnace I ordered today. I heated to glowing the crucible for one hr... here is a quick video.
kevinpaw123
Number of posts : 217 Age : 60 Location : Garrsion, Minnesota Registration date : 2009-01-25
Subject: Re: Photos of progress Sat Jan 09, 2010 2:30 pm
Hey guys These are of the silver. I've fired it once so far." border="0" alt=""/> " border="0" alt=""/> I was able to get more out of the crucible. After I crushed it I mixed in some fresh silver/salt" border="0" alt=""/> Nick does this look right? I waited till the crucible was glowing before I started timing the hour. At the end I covered the furnace hole and let it cool slowly.
Guest Guest
Subject: Kevin Sun Jan 10, 2010 12:08 am
I have not tried silver yet, but I have done the gold.
My crucible is almost like your but bigger.
Did you use concrete cement to seal the crucible inside the iron container?
I would think that the ashes should be black, but Nick may know better.
If I am wrong Congratulations!
Guest Guest
Subject: I took these pics of my Au in Alkahest Sun Jan 10, 2010 1:06 am
My gold disolved with NO problem after the heating and cooling sessions.
Nick this forum is terrible to upload pictures!!!
So here is the link to flicker where the standard Dew Sea Salt method is posted and please find the clear leydon photos that I took today.
That is the way my alkahest looks like.
http://www.flickr.com/photos/wordstone/
kevinpaw123
Number of posts : 217 Age : 60 Location : Garrsion, Minnesota Registration date : 2009-01-25
Subject: Re: Photos of progress Sun Jan 10, 2010 1:11 am
I'm only using the Iron pipe as a crucible within the furnace. Yes I am using concrete cement to seal the pipe. This is the 2nd round in the furnace.
NDC Admin
Number of posts : 599 Age : 43 Location : beyond the veil Registration date : 2008-12-26
Subject: Re: Photos of progress Sun Jan 10, 2010 2:49 am
Awe Kevin, I'm so jealous you got your furnace before I got mine! They haven't even shipped mine yet.
Your powder by now should have become a glass, but it seems that it hasn't changed into the proper state yet, so your silver is probably still regular silver. But maybe since you have a lot of sodium chloride salt in there, it's hiding the silver glass. You are going to need to devise a way to separate out the salt.
To test if you silver is still normal silver, you can dissolve the powder in some hot water. The salt will dissolve, and the silver will remain as a powdered oxide on the bottom if it's still normal. You can then melt that powder and see if it forms normal silver again.
Some of the silver may have converted to the stone, so you should then weight the silver that you make from the powder, and see if it still weighs the same as it originally did. If not, then that means the other silver is probably in the soluble glass-like state, mixed in with that salt water solution, so you know the salt water solution probably contains the elixir of the white stone, but it could also just contain silver bonded to the sodium from the salt, and that made it water soluble.
But if the silver weights exactly the same as it did in the beginning, then all this work did nothing at all, because none of the silver converted to the water soluble glass.
Having that salt in there really impedes the process since you can't easily remove it, and it doesn't decompose even with the high heat. It melts at 801 °C (1474 °F), but it doesn't even boil until 1413 °C (2575 °F), and I don't know how much heat it takes to finally make it decompose into sodium hydroxide, but even if it did, that would still be just as hard to remove as the salt.
Ammonium chloride sublimes away nice and easy, and ammonium nitrate decomposes or explodes. But this normal table salt seems to be impossible to separate from the silver.
kevinpaw123
Number of posts : 217 Age : 60 Location : Garrsion, Minnesota Registration date : 2009-01-25
Subject: Re: Photos of progress Sun Jan 10, 2010 4:17 am
Hey Nick! Did you order one from Lost and Foundry? I'm going to finish with the remaining silver/salt I have. If nothing then I'll dissolve it in hot water. I got some Ammonium chloride as you had suggested earlier. I do need to get a couple quality crucibles... I have a small 50ml ceramic crucible/w lid I got from Crucible Catalog. I still have the dew/rain also...would it be a good idea to add some Ammonium chloride to it before growing the crystals?


 " border="0" alt=""/>
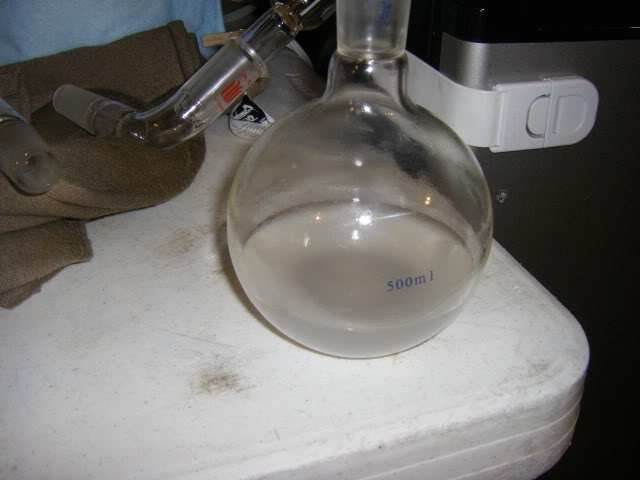 " border="0" alt=""/>
 " border="0" alt=""/>
 " border="0" alt=""/>
 " border="0" alt=""/>
 " border="0" alt=""/>
 " border="0" alt=""/>
 " border="0" alt=""/>
 " border="0" alt=""/>
 " border="0" alt=""/>
 " border="0" alt=""/>
 " border="0" alt=""/>
 " border="0" alt=""/>
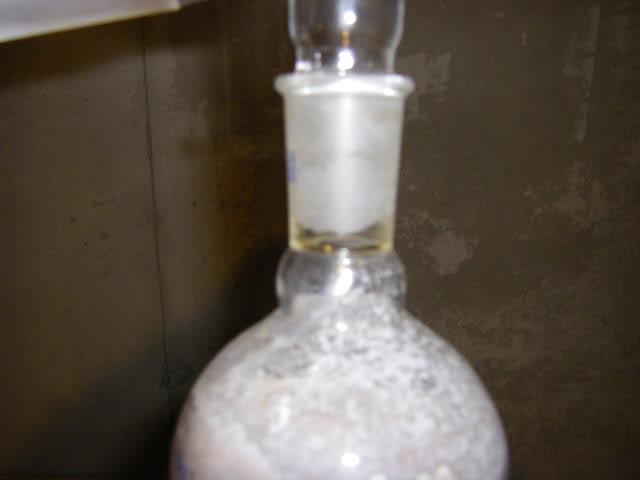 " border="0" alt=""/>
 " border="0" alt=""/>
 " border="0" alt=""/>
 " border="0" alt=""/>
 " border="0" alt=""/>
 " border="0" alt=""/>
 " border="0" alt=""/>
 " border="0" alt=""/>
  " border="0" alt=""/> I was able to get more out of the crucible. After I crushed it I mixed in some fresh silver/salt
 " border="0" alt=""/>